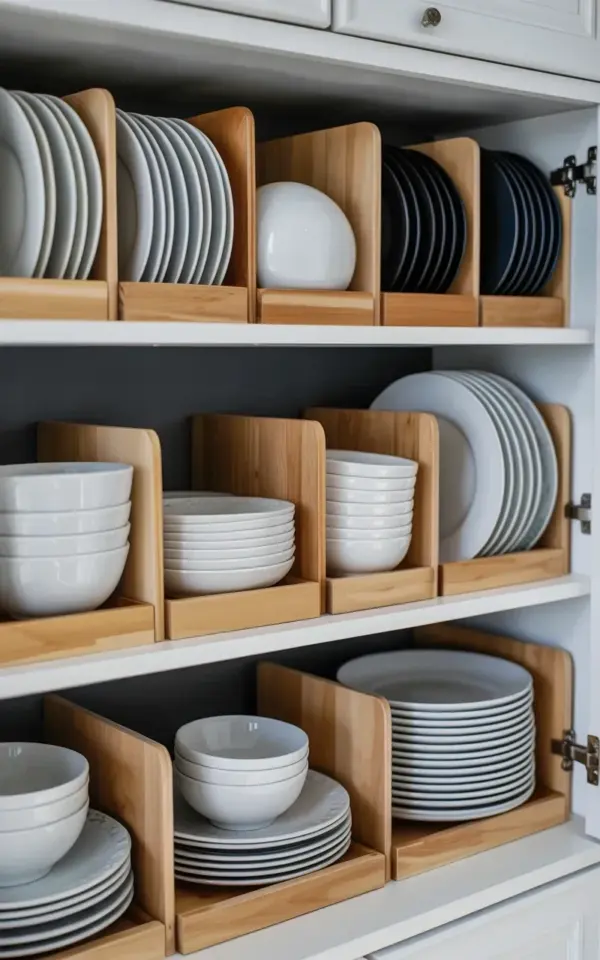
Three tiers of dishes, and not one of them wobbles. That’s what these kitchen pantry shelves with wooden dividers do for a space that usually turns into a ceramic free-for-all. The photo shows it plainly: white ceramic plates on the left, black plates up top, and neat little compartments of bowls sitting in between. It’s not complicated. It’s just smart use of vertical space. If you’ve been fighting with leaning stacks of plates every time you open the pantry door, this is the fix you didn’t know you were looking for.
Let me show you how to get this look without spending a fortune. The pantry organization idea you’re about to copy costs less than a takeout dinner for two, assuming you have a saw and a drill. A lot of people think custom storage means custom prices. That’s just not true when you’re building simple wooden dividers. Plywood, a few basic tools, and an afternoon of work will get you there.
## The Real Problem with Tossing Dishes on a Shelf
Here’s the thing about stacking plates bare on a pantry shelf: they never stay where you put them. You pull out a bowl from the bottom of a stack, and suddenly the whole tower shifts. Something slides. Something clinks. Eventually something chips. I’ve lost two good cereal bowls to that exact scenario, and honestly, one was my favorite color. It’s frustrating because the solution is so obvious in hindsight. Every plate and bowl just needs its own designated slot.
The visual in that photo solves it with light beige wooden dividers that create individual compartments. The top shelf has black plates on the right and white plates on the left, which is a nice touch if you’re a visual person. But the real genius is the middle shelf. Those white bowls sit inside their own wooden compartments, stacked neatly without any risk of sliding sideways. No more fishing for the right size bowl by feel. Every dish has a home, and you can see it instantly.
Here’s a quick list of what you’re actually solving:
– Stacks that lean and threaten to topple
– Chipped edges from plates knocking into each other
– The need to unstack three dishes to reach the one you want
– Wasted vertical space above short stacks of plates
– The general chaos that makes the pantry feel cramped
## Choose Your Wood: What I Used and Why
I’m not gonna lie, I went to the home improvement store with a very specific plan. I wanted something light in color, because the dividers in the photo are that light beige tone, and I didn’t want the wood to visually overpower the white ceramic dishes. The answer was birch plywood. It’s strong, it’s relatively inexpensive, and it has a clean, warm color that matches that photo almost perfectly. A single 4×8 sheet of 3/4 inch birch plywood is more than enough for a full pantry setup, and it costs around forty dollars.
Now, if you’re on a tighter budget, go with standard sanded plywood. It’s cheaper, but it’s not as pretty. Or, here’s a little secret: check the scrap bin at your local hardware store. I’ve found pieces of hardwood plywood for a few dollars that were perfect for this project. As long as the wood is flat and free of major warping, you’re good. For cutting, I used a circular saw with a fine-tooth blade to avoid chipping the veneer. If you’re not confident with a saw, have the store cut it for you. Most places will do basic cuts for free.
## Building the Dividers: A Simple Process
Honestly, this is one of those projects where the building part is trivial. The measuring part is where you need to focus. The basic principle is this: you create a U-shape that fits over the shelf. Two vertical side pieces and one horizontal top piece. The sides rest on the shelf surface, and the top piece spans the gap between shelf levels, held in place by the weight of the shelf above. It’s tension and gravity doing all the work.
Let me walk you through a basic divider box. You’ll want your dividers to be roughly 10 to 12 inches deep, depending on your shelf depth, and about 8 inches tall. The width of each compartment should be just a bit wider than your largest plate. For reference, a standard dinner plate is about 10.5 inches in diameter. So a compartment of 11 inches gives you a snug fit without making it hard to slide plates in and out.
I started by measuring the height between shelves. That measurement determines how tall your dividers can be. My shelves have about 9 inches of clearance, so I made the dividers 7 inches tall. That leaves plenty of room to grab plates from the top without scraping your knuckles. For the vertical sides, I cut them to that height, and for the top piece, I made it the depth of the shelf minus a quarter inch. Assemble them with wood glue and finishing nails, and you’re done. Screw them together in place from the outside if you want them removable, or use a few screws into the shelf itself for a permanent fixture. Just check what’s above first. A screw that’s too long will poke up through the shelf above, and that’s a mistake you’ll notice when you slice your hand on it.
## Sizing Your Compartments for Real Dish Sizes
This is where the practical details matter. You can’t just guess the widths and hope for the best. I recommend measuring your actual dish collection before you cut anything. Grab a ruler and measure the diameter of your dinner plates, your salad plates, your bowls, and your saucers. Write them down. Group items with similar sizes together, because that’s how you’ll arrange your compartments. You don’t want a compartment built for salad plates trying to hold large pasta bowls. It won’t work, and you’ll be annoyed every time you use it.
Let me share my exact setup from the photo. The top shelf has black plates on the right and white plates on the left. The side with white plates uses dividing walls set about 11 inches apart. The black plates are slightly smaller, so those compartments are only about 9.5 inches wide. The middle shelves hold white bowls and plates, arranged inside wooden compartments that are sized specifically for each piece. The bottom shelf has white ceramic bowls and plates arranged in larger compartments. The dividers are doing the heavy lifting here. Without them, those bowls would be stacked inside each other and tough to pull apart.
## A No-Build Alternative: Wire Racks That Do the Same Job
What if you rent your place and can’t put screws in the walls? What if you just don’t own a drill? Here’s the thing, wooden dividers are great, but they’re not the only game in town. You can buy wire plate holders and metal shelf dividers that do almost the same job. They hook onto the shelf below or the shelf above, creating vertical partitions. They’re adjustable, so you can move them around when your dish collection changes. That’s a real advantage honestly. My wooden dividers are gorgeous, but they’re not flexible. If I buy a new set of wider plates, I’m rebuilding a few compartments.
The wire rack route is also genuinely cheaper upfront. You can pick up a pack of six metal shelf dividers for fifteen dollars on a good day. They don’t look as warm or custom as wood, but they work. I’ve used both in different homes, and I’ll tell you straight: the wood looks better, but the wire racks are easier to live with. If you want the aesthetic of the photo without the commitment, go wire first. You can always upgrade to wood when you’ve confirmed your compartment sizes and your dish storage habits are stable.
## Sealing and Maintaining Your Wooden Dividers
Okay so here’s a detail nobody mentions in the pretty Pinterest posts: food occasionally touches these dividers. A damp plate, a wet bowl, a splash of pasta sauce. You need a protective finish. I used a water-based polyurethane on my dividers, three thin coats, letting each one dry fully. It’s a bit of a chore, but it takes about an hour of actual work and a day of waiting. The finish prevents moisture from soaking into the wood and warping it. It also makes the dividers easy to wipe down with a damp cloth. A patina is nice on some things. Not on your dish storage.
One more maintenance tip, and this comes from personal experience. Lighter-colored wood shows dust like crazy. Use a soft brush attachment on your vacuum or a dry microfiber cloth to keep the corners clear. I do a quick pass every time I do a deeper kitchen organization sweep, probably twice a month. It takes two minutes. The alternative is letting crumbs and dust collect at the base of every divider, which is honestly gross and makes your organized pantry look worse than a disorganized one. A clean pantry is easy upkeep if you schedule it. Two minutes, twice a month, that’s the whole secret.
So here’s the takeaway from all of this. Start with a pile of wobbly plates and a chaotic pantry shelf. End with light beige wooden dividers that make every dish visible and every stack stable. It’s a budget-friendly afternoon project that completely transforms how your kitchen pantry functions. Measure your dishes, grab some plywood, and give those ceramic pieces their own permanent spot. Your future self will thank you every single morning when you grab a bowl without a fight.
Leave a Comment