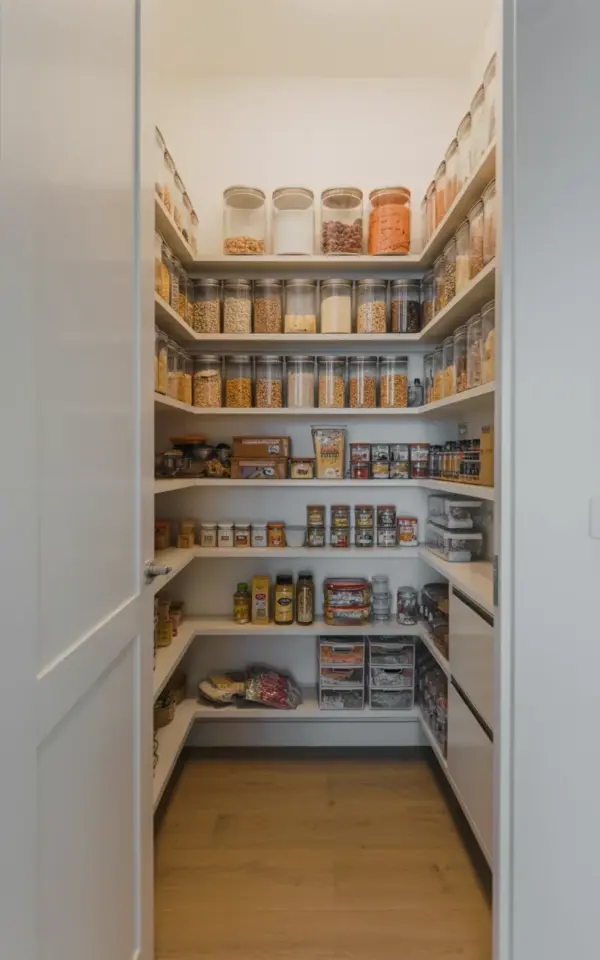
There’s a specific kind of peace that comes from opening a pantry door and seeing every single grain, snack, and baking supply in its rightful place. I remember staring at the photo of that bright modern walk-in with white walls, warm wooden flooring, and those gleaming copper accents, thinking, “How do they get it to look like that?” It looks effortless, but the reality is that a space like this is the result of avoiding a handful of very common, very frustrating mistakes. This isn’t about just throwing some jars on a shelf; it’s about building a system that survives a Tuesday night dinner rush. Let’s walk through the pitfalls that turn a dream pantry into a chaotic black hole, and specifically, how to fix them.
Skipping the U-Shaped Layout: The Mistake of Wasted Corner Space
Look, a walk-in pantry is a luxury, but it’s only a luxury if you actually use every square inch. The biggest mistake people make is treating the space like a hallway, lining the two longest walls and leaving the back wall completely empty. The photo that sparked this whole idea features a U-shaped shelving unit, and that back wall is doing some heavy lifting. It’s not just about more shelves; it’s about creating a flow where you can walk in, see everything at a glance, and turn around without bumping into a stack of canned goods.
The U-shape creates a natural command center. You have the tall, less accessible shelves in the corners for bulk items, and the sweet spot, the middle shelves, right at eye level for daily essentials. When you leave the back wall bare, you’re essentially cutting your storage capacity by a third. That’s a lot of wasted potential.
Here’s what you should do instead:
- Install shelving that wraps around three walls, ensuring the depth is consistent (or intentionally varied) to avoid awkward dead zones.
- Use the deep corner shelves for items you buy in bulk, like extra pasta boxes or paper towel rolls, not for the spices you need daily.
- Reserve the bottom shelf for heavy appliances or bulky stand mixers that are a pain to lift from high up.
- Consider drawer units on the lower level for small, labeled containers, just like the pantry in the reference photo, which keeps snacks and baking supplies tidy without towering stacks.
That last point is crucial. The photo shows drawer units on the lower shelves, and honestly, that’s where the real organization magic happens. It keeps things contained and prevents the “fall of the tower of Tupperware” that happens when you just stack things on a flat shelf. Is it perfect? No, but it’s a system that works because it respects how you actually move in the room.
Choosing the Wrong Containers: When Glass Jars Become a Problem
There is a specific, almost hypnotic beauty to uniform glass jars filled with colorful grains and legumes. That effect is the entire draw of the “glass jars” aesthetic, and the bright pantry in the image nails it. But here’s the mistake: buying containers that don’t fit the shelf depth or the quantity you actually consume. It’s a major annoyance. If your jar is too tall for the shelf, you waste vertical space. If it’s too narrow, you have a row of fifty jars that tip over when you grab the one in the middle.
Glass jars are heavy, too. Not gonna lie, I once made the mistake of filling a huge glass vessel with flour and placing it on a high shelf. Getting it down required a core workout and offering a small prayer to the shelving unit gods. Check the weight rating of your shelves before you commit to an all-glass system. For upper shelves, prioritize lighter, clear plastic containers for items like snacks and cereal, saving the heavy glass for lower, easily accessible spots. The visual mix in the photo, large clear jars up top and smaller, safer plastic containers on the middle shelves, isn’t accidental; it’s smart physics.
And let’s talk about the labels. A jar full of beige powder is just beige powder until you label it. The pantry in the picture has neatly labeled containers, which looks great, but the real function is so you don’t have to play ‘guess the grain’ every time you bake. Invest in a good label maker, or at least some consistent chalk labels. It saves so much time and mental energy during the busiest part of the day. You won’t regret it.
Neglecting the Base: Why Warm Wood Tones and White Walls Matter
Most people think organization is just about the stuff, but the backdrop matters just as much. The white walls and natural wood floor in the reference image aren’t just decoration; they’re functional. White reflects light, which is essential in a windowless room like a pantry. Honestly, a dark, dingy pantry feels like a cave, and nobody feels motivated to keep a cave tidy. The warm wood flooring grounds the space and gives it a calming, natural feel that prevents the room from feeling like a sterile laboratory.
This is where the copper accents come in. Copper, whether it’s in the light fixtures, the hardware on the drawers, or a small basket, adds a pop of warmth that ties the whole aesthetic together. It’s a tiny detail that makes a massive difference. You don’t need to overhaul the entire house; just a few copper pieces can elevate the entire look from “basic storage room” to “intentional home design.” Let’s be clear, a pantry should never feel like a punishment to walk into.
Think of the floor as the foundation of your system. If you have a slippery or overly glossy floor, you’re less likely to walk in and out quickly. The natural wood in this pantry adds a tactile softness that makes the room feel more like an extension of the kitchen rather than a forgotten closet. It’s an expert-level trick. It moves the pantry from being purely utilitarian to a space you actually enjoy spending a few minutes in while you grab ingredients.
Forgetting Function for Aesthetics: The ‘Pretty And Pointless’ Trap
Here’s the thing about those gorgeous, styled photos on Pinterest: they are often just that, styled. The mistake is trying to replicate that aesthetic without considering your real life. If you have a family that loves to snack, having all your snacks in clear jars is great, but if you don’t have a plan for what gets eaten first, you’re going to have a bunch of half-empty jars cluttering the shelves. The U-shaped shelving unit in the photo is set up to be beautiful, but it’s also incredibly functional, which is a rare and valuable combo.
Don’t decant items just because it looks nice. Decant items that you use frequently and in larger quantities. For example, placing cereal boxes in the pantry is fine, but placing the cereal itself in a tall, airtight jar keeps it fresh and makes it easy to see when you’re running low. This is a good system. On the other hand, don’t put a bag of chips in a fancy glass jar only to have it go stale because you didn’t seal it properly. Airtight is the only way to go, or else you’re just creating a pest buffet and an expensive mess.
Another function-first tip is to actually install a small step stool inside the pantry. It sounds silly, but it’s a game-changer. Those upper shelves in the photo are gorgeous with those large jars, but you need a safe way to reach them. A step stool isn’t a sign of failure; it’s a sign of planning. It lets you use the very top shelf for overflow items without needing to drag a kitchen chair into the hallway. Prioritize accessibility. If you can’t reach it, you won’t use it, and then it just becomes decoration that collects dust.
Ignoring the ‘Kitchen Storage’ Hierarchy: Zones Are Life
Ok, so you’ve got the shelves, you’ve got the jars, now what? The most common mistake I see in “kitchen storage” is a lack of zoning. The photo shows a clear layout where grains and legumes are on one shelf, snacks are on another, and the lower drawers hold specific smaller items. That isn’t random placement; it’s zoning. If you put everything anywhere, you’ll be hunting for the coconut oil every single day. It creates a mental load that you simply don’t need.
Create zones based on how you cook. Group baking supplies together, group breakfast items together, and group dinner staples together. This isn’t just about organization for the sake of it; it’s about efficiency. When you’re making banana bread, you want the flour, sugar, baking soda, and vanilla extract in one place. The visual cue of seeing all those labeled glass jars together actually helps your brain process the recipe faster. It sounds a bit woo-woo, but I swear by it.
You need to establish a rule for ‘first in, first out’ with your zones. Before you put away the new bag of rice, move the older bag to the front. This is simple to do and prevents you from having weird, ancient grains hidden behind new ones. It gives you a sense of control over your kitchen and your budget. Just a small habit, but it’s the difference between a pantry that looks good and one that actually functions well. Make sure the zones have a natural flow.
The Final Touches: Lighting and Daily Maintenance
A pantry is a room without windows, so lighting is not a luxury; it’s a necessity. The copper accents in the reference photo pop because of the bright, natural-looking light. If you have a dim, single overhead bulb, you are fighting a losing battle. You’ll miss things, you’ll lose things, and you’ll get frustrated. Adding a simple, battery-operated LED strip under each shelf is a game-changer. It highlights the contents of your glass jars and makes the labels legible, which is the entire point of the exercise.
Daily maintenance is the unsung hero of pantry organization. The system will fail if you don’t respect it. It takes two minutes to put the jar back on the right shelf, but it takes an hour to reorganize a chaotic pantry. Don’t let it get to that point. Spend two minutes daily just scanning the shelves and grabbing anything that’s out of place. It’s a tiny, boring habit, but it works. This is the part people forget when they admire the beautiful “pantry organization” photos. They see the result, not the daily discipline.
So there you have it. It’s not about buying the most expensive jars or having a perfectly curated aesthetic. It’s about avoiding the common mistakes of ignoring your floor layout, choosing the wrong containers, forgetting the lighting, and not creating simple zones. The walk-in pantry with the wooden floors and copper accents is achievable, but it’s a system that has to be built on purpose. You can have a pantry that looks beautiful and functions just as well as it looks. It just takes a little bit of planning.
Take a look at your own pantry. Walk in and look at the corners, the floor, and the lighting. Find the one area that frustrates you the most today and fix just that one thing. You’ll be surprised how quickly the rest of the pieces start falling into place. Start there, and save this article for your next big organization project!
Leave a Comment