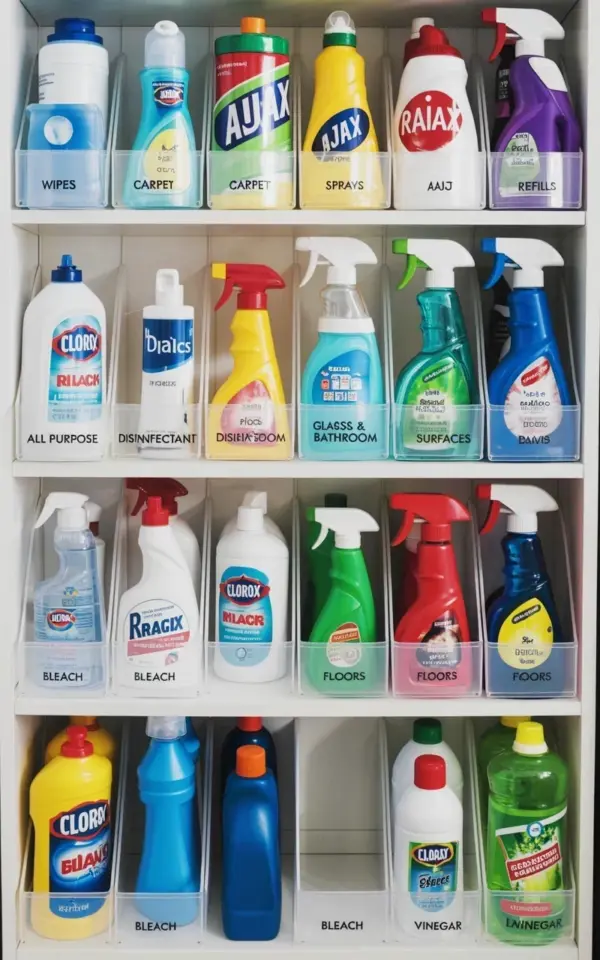
I used to keep my cleaning supplies in a cardboard box under the sink. The box was a disaster. Every time I needed the glass cleaner, I had to pull out seven rusty spray bottles, a bottle of bleach that was somehow sticky, and a lonely sponge. Not exactly a five-minute job. Then I found this idea: budget cleaning supplies organization with clear plastic dividers and simple labels. No fancy bins, no expensive drawer systems – just a few dollar store parts and a label maker. And honestly, it changed everything. The photo that inspired me shows a four-tier shelf with sections for wipes, sprays, bleach, vinegar, and even a slot just for carpet stuff. It looks clean enough to be a kitchen display.
Dollar Store Dividers That Actually Work
Here’s the thing: you do not need expensive custom organizers. The clear plastic dividers in the photo come from a dollar store. I found a pack of three at Dollar Tree for, well, a dollar. They are basically long strips of clear plastic with little grooves that let you snap them together into a grid. You fit them right onto your existing shelf. Sound flimsy? They are not. I accidentally knocked one with a heavy bottle of bleach and it held up fine. The top shelf in the photo has separate sections for “WIPES,” “CARPET,” “SPRAYS,” “AJAX,” “RAID,” and “REFILLS.” That is a lot of categories for one shelf. But with dividers, each product stays upright. No tipping. No domino effect when you grab the Lysol.
One weird thing I noticed: the dividers also force you to stop buying extra stuff. If the section for all-purpose cleaner is full, you cannot just cram another bottle on top. It makes you think, “Do I actually need a fourth bottle of cleaner?” Probably not.
DIY Labels That Do Not Peel Off After a Week
Labels are the real magic here. The photo shows labels like “ALL PURPOSE,” “DISINFECTANT,” “FABRIC,” “GLASS & BATHROOM,” and “SURFACES” on the second shelf. Clean, readable, straight. I tried handwriting labels once. They looked like a toddler’s art project. So I went with printable labels instead. There are free templates online. You print them on sticker paper, cut them out, and stick them. But here is the catch: paper labels peel off. The humidity under a sink kills them.
My fix? Clear packing tape over the paper label. Just tape it down completely – top, bottom, sides. It creates a cheap laminate that survives accidental spray spills. Or you can buy a label maker. I got a used one for eight bucks at a thrift store. Worth every penny. The photo uses black text on white labels, which looks crisp. I personally prefer a slightly off-white label because it hides dust better.
- Use clear packing tape over paper labels to seal out moisture.
- Write labels in capital letters for faster scanning.
- If you print labels, leave a tiny border so you do not cut into the text.
- Try removable adhesive sheets if you reorganize often.
Why I Group by Job, Not by Brand
Ok so the second shelf in the photo categorizes by cleaning job: all-purpose, disinfectant, fabric, glass and bathroom, surfaces. That is smart. I used to organize by brand – all Clorox together, all Lysol together – which meant I had to remember which brand did what. Dumb. Now I think about the task. If I am cleaning the bathroom, I grab the bottle from the “GLASS & BATHROOM” section. Simple.
But here is a small rant: why do some products overlap? My “ALL PURPOSE” cleaner also works on glass, but I still keep it separate because the label says “glass” on the other section. Honestly, having multiple categories forces me to actually read labels. I discovered that my “FABRIC” spray is also labeled for carpets. So now it lives under “CARPET” on the top shelf. Move things around. The dividers let you re-arrange sections in seconds. Slide a divider over, and boom, new category.
The Bleach and Vinegar Safety Zone
The bottom shelf in the photo has two large sections: “BLEACH” and “VINEGAR.” That placement is not an accident. Bleach and vinegar should never mix (toxic chlorine gas – scary). But storing them next to each other visually reminds me: keep these separate. The photo shows them on the same shelf but in different divider pockets. That works because the dividers are tall enough to prevent the bottles from touching if they fall over. Still, I keep bleach on one side and vinegar on the other, with a divider wall between them. Also, the bottom shelf is safer. If a bottle leaks, it drips onto the shelf instead of onto products below.
One more thing: the “BLEACH” section has a label that says “FLOORS” next to it on the third shelf. That makes sense – floor cleaner often contains bleach. But my floor cleaner is peroxide-based, so I keep it separate. Check your own bottles. Not gonna lie, I have a weird habit of reading ingredients labels like a psycho. It saves headaches.
Why the “REFILLS” Section Changed My Shopping Habits
Look at the top shelf: there is a slot marked “REFILLS.” That is genius. Instead of throwing out empty spray bottles and buying new ones, I buy large refill jugs and keep them here. The photo has a bottle of “REFILLS” tucked between the Raid and the Ajax. I do the same thing now. It cuts down on plastic waste, and it saves money. A giant jug of all-purpose concentrate costs half as much as three ready-to-use spray bottles.
But here is the honest part: I forget to refill the small bottles sometimes. So I keep a sticky note on the wall that says “refill now” when the big jug is empty. The clear dividers make it easy to spot when the refill section is running low. You can see the empty space through the plastic. No rummaging.
The Aesthetic Bonus: You Will Actually Want to Open the Cabinet
I never thought I would say this about a cleaning supplies shelf, but it looks kind of nice. The clear dividers and matching labels make everything look intentional. The photo shows a neat row of bottles in cheerful blue, green, yellow – each in its own slot. It is satisfying. When you open the cabinet door, it feels like a little store display instead of a pit of despair.
And here is the real kicker: because it looks tidy, I actually put things back in the right spot. Before, I would just shove a bottle anywhere. Now I want to see the label line up. That is the power of visual organization. It bribes your brain into being neat. Totally worth the twenty bucks and an afternoon.
So grab some plastic dividers and a roll of labels. Your shelf might end up with a crooked label here and there – mine sure does. But you will know exactly where the glass cleaner is. And that is the whole point. Save this idea for your next declutter day. Seriously, your future self will thank you when you do not have to dig through a sticky cabinet.
#cleaningorganization #budgetfriendly #cleaninghacks #homemaking #organizationideas
Leave a Comment