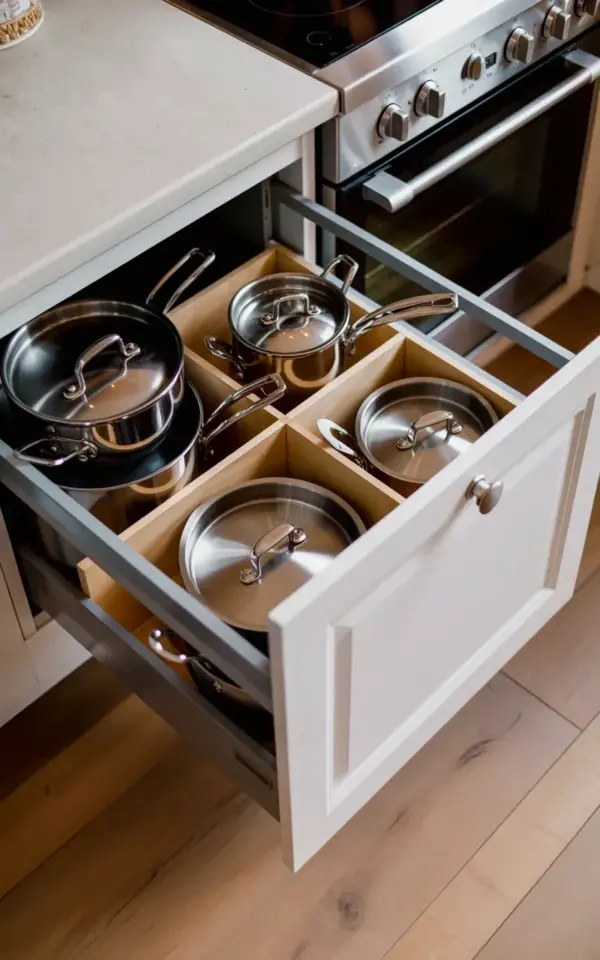
Look, the photo above is exactly what I want every kitchen drawer to feel like. That pull-out drawer with the white face, silver round knobs, and a full set of stainless steel pots sitting in custom wooden dividers? That’s not just storage, that’s peace of mind. This kind of cookware drawer organization turns your most-used pans from a clanging pile into a system where every piece has a home.
Especially now, in the middle of soup-and-stew season, I want to grab the right pot without playing stack tetris. You know the drill: the medium fry pan is stuck under the big stockpot, the lid is wedged sideways, and you’re already late. The solution is right there on the light wooden floor, literally pulled out in front of you. That drawer with the light beige dividers, the one in the photo, it solves all of that.
Why Wooden Dividers Make the Most Sense for Pans
Honestly, I’ve tried every kind of organizer for my cookware. Wire racks scratch the stainless steel. Plastic grid systems slide around and collapse under the weight. Wood, though? Wood is forgiving, solid, and doesn’t make your pans scream when you open the drawer. The wood absorbs a little vibration, so things stay quiet.
Here’s the thing: wooden dividers can be built to fit your exact drawer. Not some generic “one size fits all” contraption. You get compartments that are wide enough for a bulky stockpot and narrow enough for a small fry pan. That’s exactly what I see in the photo, large round-bottomed pots next to medium fry pans, each sitting in its own spot.
The benefits stack up pretty fast:
– No more metal-on-metal screech every time you pull the drawer open
– Lids can stay with their pots if you design the divider with a little extra depth
– Every handle is visible, so you don’t accidentally grab a hot pan by the wrong end
– The wood warms up the look of an all-steel drawer, especially in a bright, white cabinet
And honestly, there’s a strange satisfaction in opening a drawer and seeing everything in its place. I’m not gonna lie, I sometimes open mine just to look at it.
The Right Way to Measure Your Drawer and Your Cookware
Before you build anything, measure everything. Not just the drawer, but the pots and pans too. Grab a measuring tape and write down the interior width, depth, and height of the drawer. Then pull out your largest pot and your smallest fry pan and measure their diameters at the widest point. This is where people mess up. They measure the drawer once, then eyeball the rest.
I remember measuring my biggest stockpot as if it was square. Completely ignored the rounded base. Turns out, that pot needed almost an inch more than I planned because the bulge at the bottom wouldn’t fit between my dividers. So I had to shave down the wood with a sanding block. Took forever. Learn from me. Measure the widest part of the curve, not just the rim.
Once you have all the numbers, lay out a piece of cardboard or paper inside the drawer and draw your grid. Use painter’s tape to mark the actual compartments. Put the pans in. Move the tape around. It’s a cheap, reversible way to test the layout before you cut any real wood.
How to Design Compartments for Round-Bottomed Pots
Round-bottomed pots are the trickiest things to store. They roll. They slide. They never quite settle into a corner. In the photo, those large round-bottomed pots look like they’re held in place by simple straight dividers. So here’s the secret: don’t build a curved cutout. Build a rectangle that’s just slightly narrower than the pot’s widest point. The pot will wedge in lightly, and the wood will catch it before it can tip over.
You want about a quarter-inch of wiggle room, not more. Too tight and you’ll fight to get the pot out. Too loose and it’ll rattle around. The same logic applies to the medium fry pans. Those need a compartment that keeps the handle pointing up and out, so you can grab it without fumbling.
Another small thing: put the tall pots on the side closest to the hinges if your drawer is deep. That way, when you pull it out, you see the short pans first and the tall ones don’t block your view. It’s a small tweak, but it makes a huge difference in daily use.
Building the Dividers Yourself or Buying a Pre-Made Kit
A simple DIY approach works great. Get a sheet of 1/4-inch plywood or poplar, cut it into strips, and assemble them with wood glue and a few finishing nails. You can even ask the hardware store to cut the strips for you, which saves a ton of time if you don’t own a table saw. In the photo, those light beige dividers look like birch or maple, something clean and food-safe.
If you’d rather not build from scratch, there are adjustable wooden drawer divider kits. They use tension rods or little clips to lock into place. That’s a faster route, and honestly, it’s perfect if you’re renting or want to tweak the layout later. But for a permanent, custom fit, building your own is the way to go.
One thing I learned the hard way: seal the wood. Even a light coat of mineral oil or a food-safe varnish keeps moisture from the cookware from staining the divider. It also stops the wood from absorbing any weird smells. My own drawer still smells faintly of cedar because I used leftover cedar planks from a bookshelf project. It’s not the worst smell, but it’s not exactly neutral.
How to Keep Your Organized Drawer From Falling Apart
Once you have the system in place, treat it gently. Don’t overload the compartments. A heavy cast iron pan can tip a thin plywood divider if the force is too strong. Slide the pans in rather than dropping them. And every few months, check the glue joints and tighten any screws.
Also, put a thin drawer liner or cork mat under the wood. That stops the whole system from sliding around when you pull the drawer open. The photo shows the drawer pulled all the way out, and you can see the wood sits flush against the white drawer base. A liner just adds a little friction, so that flush fit stays nice and snug.
If a divider gets chipped or starts to split, don’t panic. It’s wood, so it’s easy to sand, glue, or replace a single strip. That’s the beauty of this system. You don’t have to throw out an expensive organizer. You just fix one small piece.
What If Wood Isn’t Your Vibe? Other Divider Options
Maybe you don’t want wood. That’s fine. I’ve seen people use stainless steel drawer organizers that look sleek and industrial. But steel dividers can scratch your pans, and they’re louder. Metal also doesn
Leave a Comment