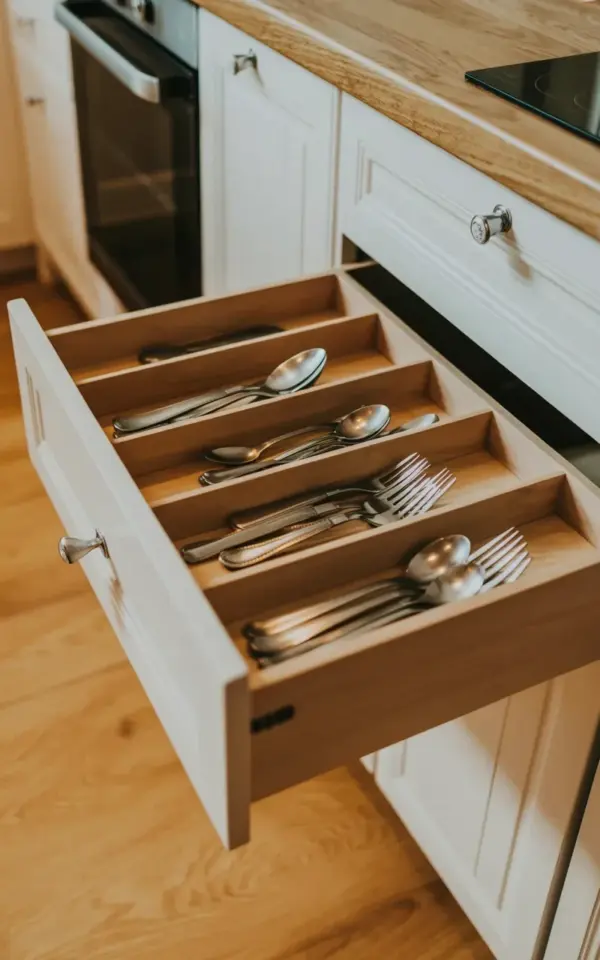
You are looking at a photograph of a drawer full of spoons and forks, and honestly, it’s the tidiest corner of my entire house. That is not a humble brag; it is a miracle, because the rest of my kitchen hides a questionable amount of mismatched Tupperware. For me, this silverware drawer sets the tone for the whole room, a small patch of calm logic in an otherwise chaotic cooking space.
I have learned that you do not need a massive renovation to feel good about your kitchen organization. Sometimes, all it takes is a single drawer, some white wooden dividers, and a clear afternoon to finally match the lids to the containers. The goal here is to walk you through this exact setup, step by step, so you can steal the look without any prior DIY experience.
Why Start With the Silverware Drawer for Kitchen Organization
If you want to test the waters of home organization, the cutlery drawer is the safest place to start. It is small, contained, and the payoff is instant, unlike that hall closet where you have to build ten shelving units just to make a dent. You open this drawer ten times a day, so every time you see the neat rows of white dividers, you get a tiny little dopamine hit.
This particular drawer sits under a white painted cabinet, and the contrast between the dark stainless steel and the bright wood is genuinely satisfying. Organization is not about perfection. It is about creating a system that your future self will thank you for at 7 AM when you are half asleep and just want a spoon for your yogurt.
What You Need for a Beginner-Friendly Cutlery Drawer Setup
Alright, let’s talk about the actual parts you need to buy. Before you even look at dividers, measure the inside width and depth of your existing drawer with a tape measure. Ignore the urge to eyeball it, because the difference between a snug fit and a gap that eats your spoons is usually just half an inch.
Here is the shopping list I used for this exact setup:
– A wooden drawer organizer with four sections (or individual wooden boxes you can arrange)
– Stainless steel silverware (standard sizes work best, nothing oversized)
– A soft, lint-free cloth for wiping down the drawer before you start
– Optional: small felt pads to stick on the bottom of the dividers so they don’t slide
I prefer wooden dividers over plastic ones because they add that warm, cozy kitchen vibe that metal just cannot replicate. The white painted finish on these specific dividers matches the cabinet perfectly, which makes the whole thing look custom built, even when it is just a standard insert.
Arranging the Silverware in a Way That Actually Makes Sense
Here is the thing about drawer dividers: you can arrange them in any configuration, so do not just settle for the default setup. In the photo, the drawer has four distinct compartments, and I like to use them for forks, spoons, knives, and then a mixed “catch-all” for serving pieces. You might think you need a separate slot for teaspoons and tablespoons, but going too specific just makes you angry when the drawer gets messy.
Group them by function rather than size. Put the large serving spoons in the back, the everyday forks in the front, and the knives pointing the same direction so you never accidentally grab a blade. Honestly, the rule of thumb is to place the silverware you use most often in the center of the drawer, right where your hand naturally falls.
The best part about this arrangement is the visual feedback. When you open the drawer and see the gleaming steel resting against the white wood, it feels like a luxury hotel sweet, but it is just your regular home kitchen.
Selecting the Right Wooden Dividers for the Cozy Kitchen Look
Not all wooden dividers are created equal, and I learned this the hard way with a cheap bamboo set that splintered after three months. Look for solid pine or poplar that has a smooth, sanded finish, especially if you plan on painting them white like these ones are. If you buy them already painted, check the edges for drips that might catch on your hands.
The light wood floor in the photo plays a huge role in the cozy aesthetic. It reflects the natural light up into the drawer, making the white dividers look crisp and clean even on a cloudy day. If your kitchen has dark floors, you can still get this effect by painting the inside of the drawer a bright white before you drop the dividers in.
A quick tip for a budget-friendly approach: buy unpainted wooden dividers and prime them first. It takes an extra hour, but the paint adheres much better and you can avoid that chalky, sticky finish that makes the drawer hard to open.
Simple Storage Ideas to Maximize the Cutlery Storage Space
Once you have the main fork, knife, and spoon slots done, it is tempting to call it a day. But look at that empty space in the divider, you have a little bit of room in the fourth compartment that you need to use wisely. That is where I keep my meat tenderizer and the tiny ladle that always gets lost in the dishwasher.
Stick to a one-layer system. If you start stacking spoons on top of spoons, you are just creating a jumbled mess that defeats the entire purpose of the organizer. If you have too much silverware to fit in one layer, get rid of the sets you never use. Donate them, or keep them in a storage bin in the pantry for holidays. A full drawer is not a cozy drawer.
I will add a ridiculous, hyper-specific detail here: I keep a single chopstick in that fourth compartment just for pushing the reset button on my espresso machine. It sounds weird, but it lives there perfectly and it keeps me from digging through the junk drawer for a pen every morning. Weirdly specific storage hacks are honestly the best part of organizing.
Maintaining the Drawer and Keeping It Looking Fresh
The downside to white wood is that it shows dirt, like, immediately. Stainless steel utensils will leave little gray smudges on the white paint over time, usually from water spots or just the friction of the metal rubbing against the sides. To keep it looking like the photo, you need to wipe the divider down once a week with a damp cloth. Just a quick swish of the rag, no heavy chemicals needed.
Make sure the silverware is completely dry before you put it back in the drawer to prevent rust rings. If you have the space, let the dishwasher rack air dry overnight before unloading it. The best way to avoid the headache of organizing a drawer is to simply never let it get to that point in the first place. A quick thirty-second tidy-up when you close the drawer is easier than a full deep clean on a Sunday.
Final Thoughts on Your Own Cozy Kitchen Setup
Taking the time to arrange this small part of your kitchen brings a strange sense of peace that is hard to describe. It is a small project, probably taking less than an hour from start to finish, but it changes the way you cook and move in the room.
So look at your current silverware drawer. Does it slide smoothly, or do you have to wrestle with a spatula that fell sideways and jammed the track? Try this setup with the white wood dividers and let yourself enjoy that little burst of happiness every time you set the table. You will be surprised at how such a simple change makes the whole home feel lighter, and I would love to hear what your cutlery drawer looks like when you are done.
Leave a Comment