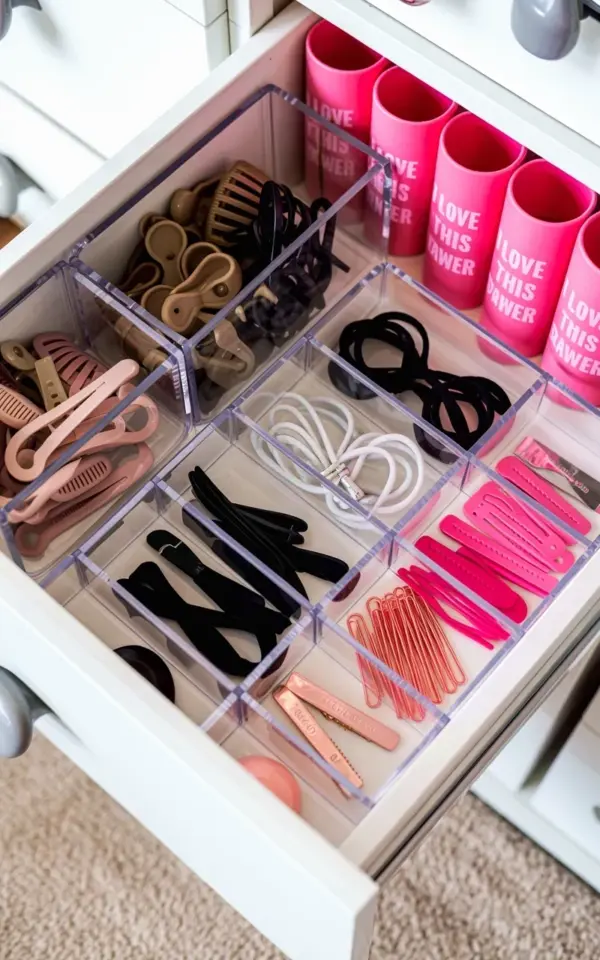
Honestly, my hair accessory drawer used to be a black hole. I’d shove in claw clips, scrunchies, and bobby pins, then spend five minutes every morning digging through the chaos to find one specific beige clip. Then I tried the clear divider method you see in this photo, and the change was immediate. This simple system for hair accessory drawer organization uses clear plastic dividers to separate brown and beige clips from black ties and pink barrettes, and it even has a dedicated “I love this drawer” section. No more rummaging. No more tangled hair ties. Just a clean, color-coded setup that actually saves time getting ready.
Clear Dividers Make a Hair Drawer Actually Work
Here’s the thing about clear plastic dividers: they force you to make decisions. You can’t just toss everything in and hope for the best. Each compartment becomes a little home for one type of item. In the photo, the left side holds a neat collection of brown and beige clips and clamps. The center has black hair ties, white ones, and small odds and ends in their own slots. The bottom right? Pink barrettes. Simple. And because the dividers are transparent, you see everything at a glance. No digging, no dumping the whole drawer onto the counter. That’s the real win. Not gonna lie, I was skeptical at first – I thought it would look like a utensil organizer from the kitchen. But once you match the compartments to your actual hair stash, it clicks.
Sorting Clips and Ties by Color (and Why It Matters)
Color sorting sounds a bit extra, I know. But look at that photo: the brown and beige clips all hang out together on one side. Black ties and white ties have their own zones. Pink barrettes get their own corner. Why does this work? Because your brain processes color faster than shape. When you’re rushing to get out the door, you don’t want to scan a pile of mixed-up accessories. You want to glance and grab the exact shade you need. For me, that means knowing my taupe claw clip lives in the top-left compartment, not buried under a mountain of black scrunchies. It’s a tiny mental shortcut that shaves off real time. Also, color coordination just looks satisfying. Ever open a drawer and smile for no reason? That’s the goal.
The “I Love This Drawer” Section: A Fun Spin on Practical Storage
The top right of the photo shows pink cylindrical compartments with the words “I love this drawer” in white letters. Cute, right? That little touch does something important. It turns a purely utilitarian storage bin into a small daily dopamine hit. I’m not saying you need a custom label for everything. But having one spot that’s just for the stuff you genuinely enjoy – your favorite hair clips, the sparkly barrettes you rarely wear but can’t part with – that keeps the whole system from feeling like a chore. Ok so, in my own drawer, that section holds my two lucky claw clips and a scrunchie I bought on vacation. They don’t get used often, but seeing them there makes me happy. Sometimes organization needs a pinch of personality.
Seasonal Refresh: When to Reorganize Your Hair Accessories
This is where the trend-aware angle comes in. I do a hair accessory edit twice a year: once in early spring and once right after the holidays. Spring is perfect because you’re swapping out heavy winter clips and tortoiseshell for lighter pastels and clear plastic. Fall is another natural reset point. The photo shows a very neutral-and-pink palette, which works for any season. But if you want to stay timely, use your divider system to rotate seasonal colors. Put the burgundy velvet scrunchies in a labelled compartment in November, then swap them for pale yellow in April. You don’t need to buy new dividers. Just shift the contents. It takes five minutes and makes your drawer feel fresh. Honestly, it’s the closet organization tip nobody talks about: rotate, don’t accumulate.
Common Mistakes People Make With Drawer Dividers
I made every mistake before I got this system right. Let me save you the frustration.
- Buying dividers that are too tall. If the compartments are deeper than your accessories, items fall over and get lost. Measure the height of your tallest clip first.
- Using one giant bin instead of multiple small sections. That “all in one” idea? It creates a mini-dumpster. You need walls between categories. The photo proves it: each compartment has its own job, from the brown clips to the pink barrettes.
- Not leaving a catch-all compartment for the weird stuff. You know, the single hair elastic that doesn’t match anything, the tiny snap clip, the broken barrette you keep meaning to fix. Give that stuff a home, or it becomes desk clutter.
- Forgetting to label. I don’t mean with fancy stickers – just a piece of washi tape with a Sharpie note. Future you will thank present you when you’re half-asleep and need a specific hair tie.
A personal weird aside: I once used a muffin tin as a makeshift hair organizer because my dividers hadn’t arrived yet. It worked, but the grease from the pan kept staining my white ties. Don’t be me. Get proper clear plastic dividers.
How to Build This System in 15 Minutes
Look, you don’t need a full afternoon. Gather your drawer, a set of clear dividers (I like adjustable ones that snap into a grid), and a trash bag. Dump everything out. Yes, everything. Sort into piles: brown and beige clips, black ties, pink barrettes, small odds and ends. Now place your largest divider compartments against the widest side of the drawer – that’s where the big claw clips go. Then fit the smaller sections for ties and bobby pins. The photo shows the “I love this drawer” compartment in the top right corner, which is a good place for a little joy. Fill each compartment, slide the drawer shut, and open it again just to admire your work. That’s it. Fifteen minutes, maybe twenty if you stop to untangle a hair tie nest. And you end up with exactly what you see in the photo: a calm, functional, pretty drawer that actually makes your morning easier.
So here’s the soft sell. You don’t need a custom closet makeover or a Pinterest-worthy vanity. You just need a drawer, some clear plastic dividers, and fifteen minutes. Try it this weekend. Grab a set of dividers, sort your clips and ties by color, and see if you don’t smile the next time you get ready. Your hair will thank you, and honestly, so will your morning mood. Got a tip? Drop it below – I’m always looking for a better way to store my pink barrettes.
#HairAccessoryOrganization #DrawerDividers #ClosetOrganizationTips #HairClipStorage #BeautyStorage
Leave a Comment