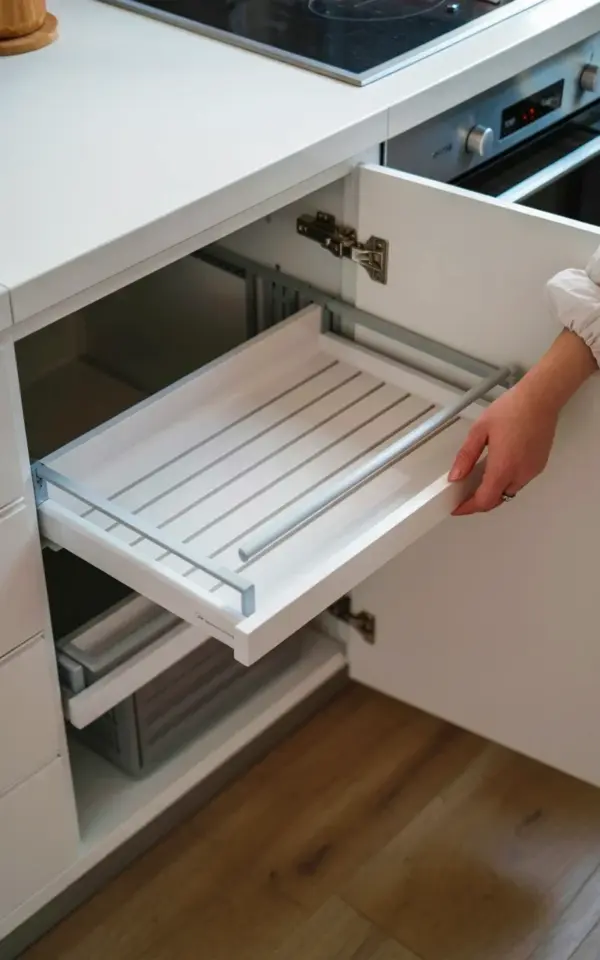
White kitchen cabinets look fantastic, sure. But they can also be a black hole for pots, lids, and random pantry items if you don’t have a solid storage system. Adding a pull out drawer to those cabinets changes everything. It is honestly one of the most satisfying weekend projects you can do. And you don’t need to be a pro woodworker either. The photo I snapped shows exactly what I mean: a white melamine cabinet, a slatted plastic tray with horizontal dividers, those metallic silver slides, and my own hand reaching in to adjust it. That tray sits on a metal slider. Beautiful. Functional. Done in an afternoon.
What You Need to Get Started with a Pull Out Drawer Install
Ok so, let’s talk tools. You do not need a huge workshop for this. Grab a drill, a measuring tape, a pencil, a small level, and a screwdriver for backup. You will also need a pair of drawer slides (the full extension kind, trust me on that) and a plastic or wooden tray that fits into your cabinet. The slatted plastic tray in my photo is just one option. I prefer plastic trays for kitchen cabinets because they do not warp if a damp lid gets left on them. And they are easy to wipe down. Also, get the right screws. Do not just guess. I once bought the wrong screws and had to drive back to the hardware store. Twice. Learn from my pain.
Here is a quick checklist of what you should have on hand before you start:
- A drill with screwdriver bits (and maybe a tiny pilot hole bit)
- Measuring tape that actually locks (nothing worse than a flimsy tape)
- Drawer slides rated for at least 50 pounds if you are storing cast iron or heavy pots
- A plastic or wood tray that is about one inch narrower than the inside of your cabinet
- A pencil, and not one of those dull stubs either. Use a sharp one.
That is basically it. You can find all of this at any hardware store. Or online if you want to wait two days for shipping. I am impatient, so I always hit the local store.
Measuring Your White Cabinet Space Correctly
This part is boring. I know. But skip it and you will regret it every time you open your cabinet door. Measure the inside width of your cabinet frame. Not the door opening. The actual space between the side panels. Then measure the depth, from the front of the cabinet to the back wall. And finally, measure the height of the opening. You need that last one to make sure your tray actually fits under any shelves. In my photo, you can see the tray sits flush with the cabinet bottom. That is the ideal scenario.
Honestly, I have a weird habit of measuring things three times. My husband says it is overkill. Whatever. It works. For the slatted plastic tray I used, I measured the inside width at 17 inches exactly. Then I subtracted a half inch for clearance on each side. That gave me a 16 inch wide tray. Do the same math for depth. You want about one inch of space between the back of the tray and the back wall of the cabinet. This prevents the tray from hitting the wall and jamming. I know that sounds fussy. It is. But it matters.
Choosing the Best Drawer Slides for Kitchen Cabinets
Here is the thing about drawer slides. Not all of them are created equal. For a pull out drawer in a white kitchen cabinet you want full extension slides. These let you pull the tray all the way out so you can actually see the stuff in the back. Partial extension slides only give you about three quarters of the tray and that is annoying. I use side mount slides for this project because they are easy to install and they are what most people have in their cabinets already. The metallic silver hardware in my photo is exactly this type.
Look for these features when you shop:
- Full extension (non-negotiable, seriously)
- Soft close mechanism if you can swing it, it keeps the tray from slamming shut
- Weight rating of at least 75 pounds if you are storing heavy canned goods
- Corrosion resistant coating because kitchens get humid and you do not want rust
The slides I used were 18 inches long and cost about fifteen bucks a pair. Not fancy. Not expensive. They work perfectly for the slatted plastic tray I had. One more thing: buy the slides before you pick your tray. The slide length determines the maximum tray depth.
Installing the Slides Step by Step for Beginners
Start by separating the two parts of your drawer slide. One part mounts to the cabinet wall. The other part mounts to the tray itself. Most slides have a little lever or tab that lets you separate them. Push it, pull them apart, done. Then hold the cabinet part against the side wall of your cabinet, about a half inch from the front edge. Use your level. Do not wing it. I once installed a slide at a slight angle and my drawer rolled forward every time I opened the door. Drove me nuts. So yes, level it.
Mark the screw holes with your pencil. Pre drill a tiny pilot hole if your cabinet is made of that sturdy white melamine like mine is. Melamine chips easily if you just drive a screw into it without a pilot hole. Take my word on that. Then screw the slide into the wall. Not too tight. Snug is fine. You do not want to strip the hole. Repeat for the other side. Then test the slide by pulling the inner part in and out. It should glide smoothly. If it sticks, check if the slide is twisted or if one screw is too tight.
And then you do the same thing on the other cabinet wall. Yes, both sides need slides. No, you cannot get away with just one. I tried that once when I was young and lazy. The tray tilted and everything slid off. Do not be like young me.
Attaching the Slatted Plastic Tray and Testing It
Take the other half of the slides (the part that stays with the tray) and screw them onto the bottom edges of your plastic tray. In my photo, you can see the tray has those horizontal slatted dividers running across the surface. That design is actually great because it holds pots and lids upright so they do not slide around. Attach the slide pieces so they are flush with the bottom of the tray and centered on the side edges. Use short screws that will not poke through the top of the tray. Nobody wants a screw head scratching their pans.
Now comes the satisfying part. Line up the tray slides with the cabinet slides. Push them together until they click. Slide the tray all the way in. Then pull it back out. Then do it again. And again. It is oddly satisfying. I do not know why. Maybe it is the immediate payoff. That click. The smooth motion. Anyway, test it with some weight inside. Grab a couple of pots or some cans and put them in the tray. Slide it in and out. The slatted dividers will keep everything from falling over. If the tray wobbles, check your screws. Tighten them if needed.
Tips for Maintaining Pull Out Drawers in White Kitchen Cabinets
White cabinets look clean until they do not, right? They show every speck of dust and every fingerprint. So a few things to keep in mind. Wipe down your plastic tray periodically. The slatted design collects crumbs if you use it for pantry items. Just pull the drawer out fully and wipe it with a damp cloth. Easy. Also, do not overload the tray beyond the weight limit of your slides. I know it is tempting to jam everything in there. But heavy loads can cause the cabinet screws to pull out of the melamine over time.
Here are a few quick maintenance tips:
- Every few months, tighten the screws on the slides (they can loosen with use)
- If the slides start to feel scratchy, spray a little silicone lubricant on the tracks, not oil, oil collects dust
- Check that the tray is not rubbing against the cabinet door. If it is, adjust the front stop on the slide
- And if you ever spill something sugary in the tray, clean it immediately before it gets sticky and hardens
White melamine scratches pretty easily too. So go easy when you slide heavy cast iron pans in and out. A little caution goes a long way.
Anyway, that is the whole process. A weekend project, maybe a Saturday afternoon if you are fast. You will look at your white kitchen cabinets and not see wasted space anymore. You will see potential. And when you open that door and the pull out drawer glides out, you will probably smile. I did.
Now grab your drill and a pair of slides. Your pots and lids are waiting for a proper home. And your kitchen will thank you for it. Have you tried installing one of these yet? Let me know how it goes. I would love to hear about your project. Happy organizing.
#pulloutdrawers #kitchenorganization #cabinetorganizer #diyhomeorganization #whitekitchencabinets
Leave a Comment