Why My Kitchen Cabinet Looked Like a Glassware Explosion (and Yours Might Too)
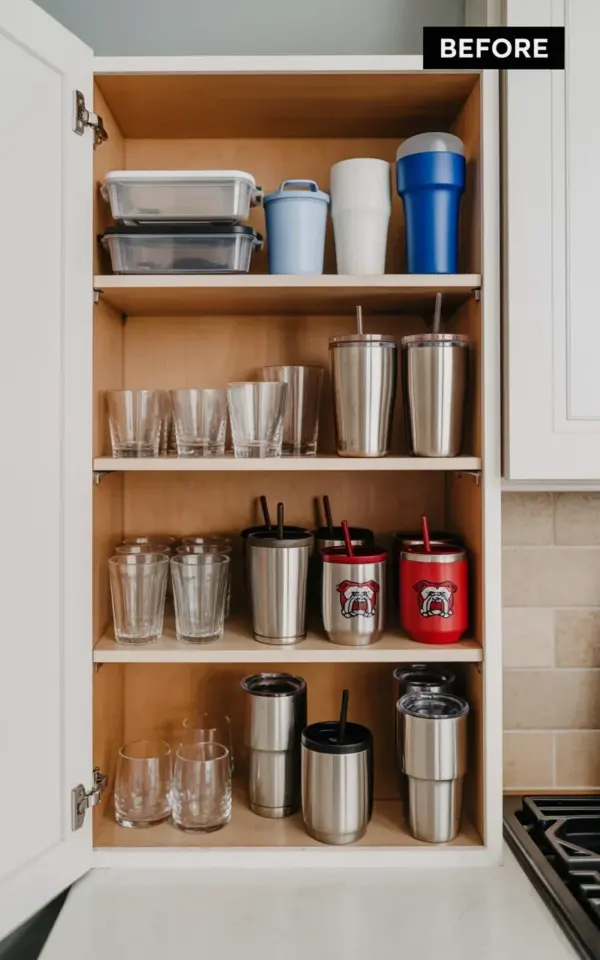
Look, I’ll be honest: that messy jumble of tumblers, wine glasses, and stainless steel cups in the photo above? That’s my actual before shot. I snapped it while prepping for holiday hosting, and I almost didn’t share it because, well, it’s embarrassing. But here’s the thing – if your kitchen cabinet organization is in a similar state, you are absolutely not alone. We all have that one shelf where everything gets shoved after a party, and suddenly you can’t find a matching glass to save your life. So I decided to tackle it before the relatives show up. This is a practical how-to guide for corralling all those drinking glasses and tumblers, step by step. No fluff.
And yes, that red tumbler with the bulldog logo? I’ve had it for years. It’s from a college tailgate where I accidentally stole it from a friend. Anyway.
Grouping Glassware by Type – The First Big Decision
You can’t organize what you can’t see. I pulled everything off those four wooden shelves and laid it all out on the counter. And honestly, I was shocked by the sheer volume. There were clear glass tumblers, stainless steel insulated cups with straws, blue and white plastic cups, wine glasses, and those heavy-duty tumblers from the camping gear section. Sorting them by type was my first step. Here’s the breakdown:
- Tall clear glasses – these are my everyday water cups, but somehow they ended up on three different shelves.
- Wine glasses – the delicate ones that clink together and make me nervous.
- Stainless steel cups – the insulated kind that keep iced coffee cold for hours. We have way too many.
- Plastic tumblers – the blue and white ones on the top shelf that the kids grab for juice.
- That lone red bulldog tumbler – it doesn’t match anything, but I keep it for the memories.
Once you have sorted piles, you can actually see what you’re working with. It’s a little painful, but also freeing. You might realize you own seventeen stainless steel cups and only use four. Not gonna lie, I donated a few to the local thrift store.
Using Shelf Dividers for Tall Tumblers (Game Changer)
So okay – the second shelf in the photo was a disaster. Clear glass tumblers and stainless steel cups were leaning against each other like tired teenagers. Every time I grabbed one, two more fell over. The fix? Shelf dividers. Honestly, they’re little plastic or metal fences that keep each stack in its own lane. I installed two dividers on that shelf: one for the tall tumblers, one for the stainless steel cups. Now they stand upright, no wobbling. It sounds boring, but it feels like magic.
If you’ve never used shelf dividers, they’re cheap and take ten seconds to install. Push them under the shelf above, twist, and done. I got mine from a big box store for like eight bucks. Best money I spent this month.
Sorting Stainless Steel Cups Without Losing Your Mind
Stainless steel cups are the chaos agents of kitchen cabinet organization. They don’t stack neatly like glassware – they nest, sort of, but then they stick together and you have to twist them apart. And those straws? They fall out and roll to the back of the cabinet. My solution was to designate one shelf (the third shelf, actually) exclusively for stainless steel. I grouped them by size: the tall skinny ones for hot drinks, the short wide ones for cold water, and the ones with lids on a lazy Susan tray. I found a little round tray at a dollar store, and now all the lids and straws live on it. No more digging.
Here’s a weird personal detail: I collect these cups from every race I run. So I have a bright yellow one from a 5k and a teal one from a half marathon. They don’t match at all. But grouping them by function (insulated vs. non-insulated) helped way more than grouping by color. Just saying.
Stacking Wine Glasses Without the Clatter
Wine glasses. They’re always the problem. The bottom shelf in the photo held my clear wine glasses and a few stray stainless steel cups that snuck in. Glassware and metal do not mix – the metal scratches the glass, and the glasses tip over. So I moved all the stainless steel cups up to the third shelf and gave the entire bottom shelf to wine glasses. I used a padded shelf liner so they don’t slide. And I stacked them in rows, not pyramids. I know some people hang wine glasses upside down, but my cabinet is too shallow for that.
If you’re really tight on space, consider a wine glass rack that hangs under the shelf above. I didn’t want to install anything permanent, so I just lined them up in a single row. It’s not fancy, but it’s stable.
Corralling the Plastic Tumblers and Kid Cups
The top shelf was the plastic wasteland. Clear plastic containers, blue and white tumbler cups, random sippy cups – it was a jumble. Here I cheated a little. I bought a small bin from the container store (about six inches wide) and dropped all the plastic cups into it, standing upright. They fit perfectly. Now the kids can grab their own cup without pulling everything else down. It’s not beautiful, but it’s functional. And for the holidays, function beats photoshoot-ready every time.
One thing I learned: don’t try to stack plastic cups inside each other. They get wedged and then you have to wiggle them apart, which always sends one flying across the kitchen. Keep them separate.
The Final Organized Reveal – What Actually Changed
After all that sorting, dividing, and binning, my cabinet looks completely different. The four shelves now have clear zones: top shelf – plastic cups and containers. Second shelf – tall clear tumblers and those blue and white cups that my sister insists on bringing over. Third shelf – all stainless steel cups, lids, and straws on the lazy Susan. Bottom shelf – wine glasses, lined up like soldiers. The bulldog tumbler lives on the third shelf now, next to the teal race cup. I like seeing it there.
Honestly, the biggest change is not visual – it’s how fast I can grab a glass now. During holiday prep, that matters. You’re pulling out punch glasses, filling water pitchers, handing out wine to guests. Every second you save stacking and searching is a second you can spend actually enjoying the party.
So here’s what I recommend: take a before photo (like I did), pull everything out, sort by type, add dividers, use bins, and be ruthless about donating extras. You don’t need seventeen stainless steel cups. Trust me.
Want to see the after shot? I’ll be posting the organized reveal on my profile soon. Save this pin to your home organization board for later inspiration, and maybe grab a coffee while you tackle your own cabinet. You’ve got this.
#kitchenorganization #cabinetorganization #holidayprep #kitchencabinetideas #organizationtips
Leave a Comment