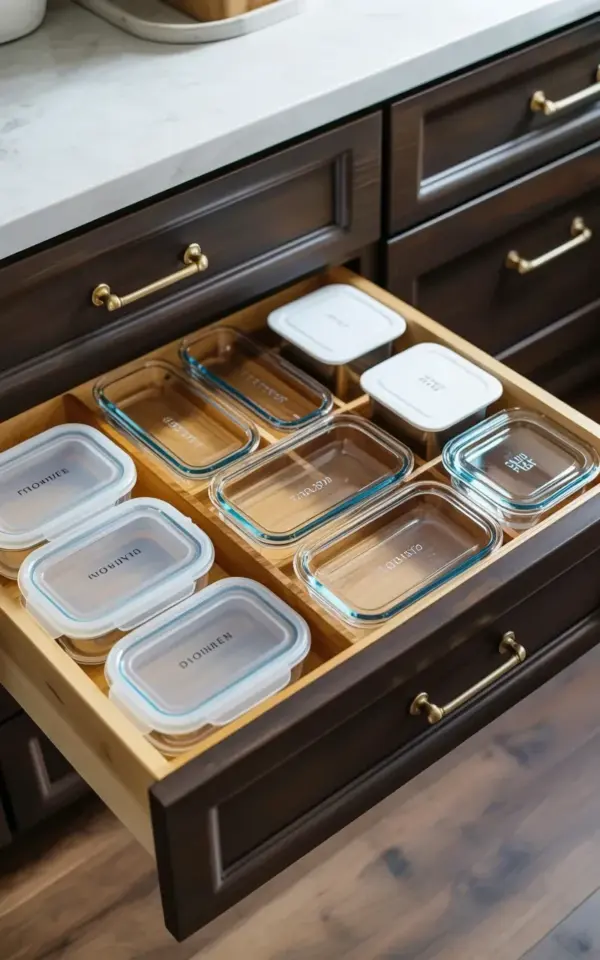
There’s something deeply satisfying about opening a drawer and seeing exactly what’s inside, especially when that drawer holds the glass food storage containers that used to live in a chaotic pile on a low shelf. This organized kitchen drawer, with its warm dark brown cabinets and brass pulls, has become my favorite little win. The secret is a mix of glass containers in every size, wooden dividers that keep them from sliding around, and white lids tucked neatly into their own spot. And yes, I managed to pull this off without spending a fortune.
If you’ve been staring at your own cabinet full of mismatched Tupperware, wondering how to fix it without buying a whole new set, this one’s for you. You probably already own most of what you need. I’m going to show you how to sort, divide, and store your glass containers so that opening the drawer actually feels good instead of like a gamble.
Why Glass Containers Deserve a Dedicated Drawer
Glass storage containers have taken over my kitchen, and honestly, they’re worth the hype. They don’t stain from spaghetti sauce, they don’t absorb yesterday’s garlic smell, and they go straight from the fridge to the oven without drama. The only downside is how bulky they are, especially when you stack them wrong and the lids go flying.
Giving them a dedicated drawer changes the game completely. You’re not digging through a cabinet and hoping the right lid is on the right container. You can actually see what you have, which means fewer containers get lost in the abyss. And when you sort by size, like the photo shows, you can grab the exact container you need without pulling everything else out first.
Sort by Size First, Ask Questions Later
Before you spend a single dollar on organizers, pull every glass container and lid out of your kitchen and put them on the counter. This might feel overwhelming for a few minutes, but it’s the crucial first step. Group the containers by size, small ones together, medium ones together, and the big rectangular ones in their own pile.
You’ll notice patterns immediately. Maybe you have eight small round containers for individual salads or leftovers. Maybe you have a few massive ones you only use for batch cooking. The point is to see what you actually own before you try to organize it. I did this in my own kitchen and found three containers I forgot I even had, they’d been buried since a family gathering last year.
Take a hard look at the lids while you’re at it. That’s usually where the chaos lives. If a lid doesn’t match anything, toss it. If a container is cracked or chipped, recycle it. Be brutal about this, it makes the whole project so much easier.
Pick Budget-Friendly Wooden Dividers That Actually Fit
Here’s where I get opinionated about the budget thing. You do not need to buy a fancy custom insert that costs ninety dollars. The wooden dividers in the reference photo look gorgeous, sure, but affordable options exist that look just as good and work just as well.
Check a few different places for drawer dividers:
- Amazon has expandable wooden bamboo dividers that you can adjust to fit your drawer width, usually under twenty bucks for a pack.
- Your local dollar store or Target has simple wooden organizer boxes that you can place side by side.
- Ikea sells bamboo cutlery trays and drawer inserts that are shockingly cheap and surprisingly sturdy.
- Thrift stores are a goldmine for wooden trays and organizing boxes, just give them a good wipe down first.
Look, the brass drawer pulls on your cabinet might be beautiful, but the interior wood tone doesn’t have to match anything. The light wooden interior finish in the photo gives the drawer a clean look, and you can recreate that with a simple bamboo tray from any home goods store. Measure your drawer before you buy anything, not after, because that’s a lesson I learned the hard way.
Stack Lids Vertically for Instant Visibility
The white plastic lids in the photo are stored on the left side of the drawer, stacked neatly in what looks like a flat pile. That’s one way to do it. Another way, which I actually prefer, is to store lids vertically using those same wooden dividers as a file system.
You can use a small dish rack or a metal file organizer to keep lids upright, or you can just wedge them between the wooden dividers. The trick is that when lids sit flat and stacked, you have to lift the whole pile to find the one you need. When they’re vertical, you can flip through them like records in a crate. It takes the same amount of space but saves you twenty seconds of fumbling every single time.
Now, if you’re following the photo exactly, the white lids are tucked inside the drawer, flat and stacked. That works too, especially if you have a very deep drawer. Just make sure you’re stacking them by size, small lids with small lids, so you’re not digging for a tiny round lid on the bottom of a tall stack.
Create Zones Within the Drawer Using What You Have
Once you have your dividers in place, think about zones instead of just tossing everything in. The organized drawer in the photo has separate compartments, which is such a smart approach. You might designate one section for small containers, one for medium ones, one for the big ones, and a final section for lids.
Here’s a practical rule I follow, and you can steal it: containers should nest or stand side by side so you can see the glass. Don’t stack container inside container, because then you’re back to the original problem of not being able to grab things quickly. It looks prettier when you can see each piece, and it helps you remember what you have.
If you don’t want to buy wooden dividers at all, which is totally valid if you’re on a super tight budget, you could use cardboard boxes cut to size and wrapped in washi tape. It’s not gonna be as durable as wood, but it costs almost nothing and honestly, it looks kind of cute if you do it neatly.
Maintain the System With a Five-Minute Reset
The best organizational system in the world falls apart if you don’t have a maintenance routine. The photo description mentions this exact thing: takes five minutes. That’s the whole secret. You don’t need to spend an hour every week reorganizing your kitchen drawer, you just need a quick reset when things drift out of place.
Every time you unload the dishwasher, put containers back in their assigned zones right away. It takes an extra twenty seconds, but it saves you from a Sunday afternoon sorting session. I got out of this habit for a few weeks and opened my drawer one morning to find a chaotic mess, so trust me when I say the small daily effort matters.
Get your kids involved if you have them. Even little ones can match lids to containers and put them back in the right spot. My niece thinks it’s a game, which honestly surprised me, but whatever works to keep the drawer tidy is a win in my book.
Other Kitchen Drawer Organization Ideas You Can Steal
Once you’ve got the glass container drawer sorted, you might catch the organization bug like I did. The same wooden dividers can work in other drawers too, so don’t limit yourself. Use them for cutting boards, baking sheets, foil and plastic wrap rolls, or even your collection of reusable water bottles.
You can also apply the vertical lid trick to pot lids in a cabinet, same concept, same relief when you actually find the matching lid on the first try. And if you want to keep spice jars or small sauce packets in order, those bamboo trays work perfectly for that too.
The beauty of this system is that it’s scalable and adaptable. You might not have brass drawer pulls or dark brown cabinets, but the principles are the same. Sort stuff by size, use dividers, keep everything visible, and make it easy to put things back.
Ok so, here’s the thing, you don’t need an expensive custom built-in organ system or a brand new set of matching containers. Start with what you have, measure your drawer, and grab a few affordable wooden dividers. Then sort those glass containers by size, tuck the lids where you can see them, and give yourself that five-minute reset when needed.
It sounds small, but there’s something genuinely calming about an organized kitchen drawer. Every time you open it, you know exactly where everything is. So grab a measuring tape and see what you can do. You might just find that this tiny project becomes your favorite little win too. Save this idea for your next reset, I promise your future self will appreciate it.
Leave a Comment