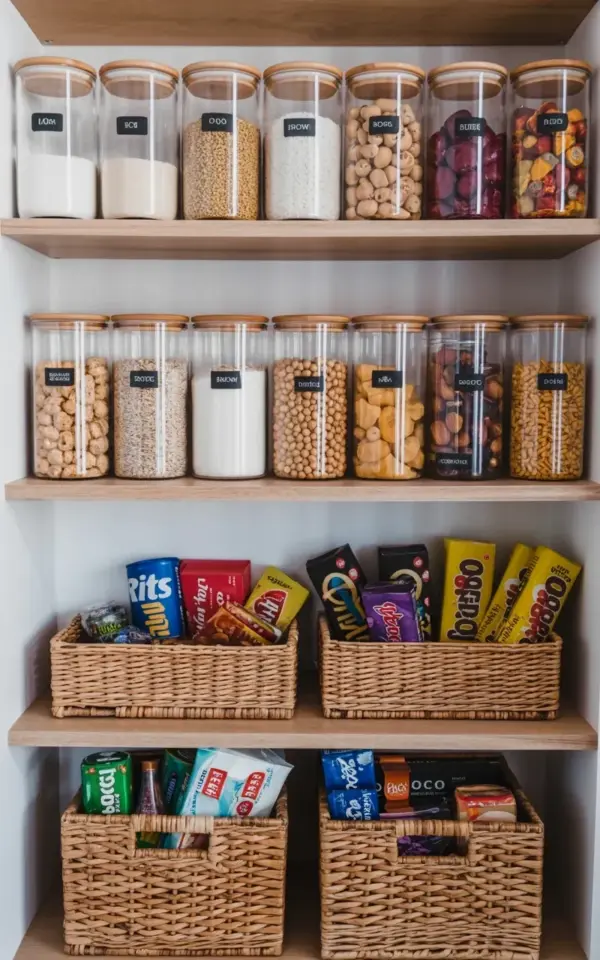
Four wooden shelves. Twelve big glass jars on top, fifteen smaller ones below, two seagrass baskets full of snacks, and a bottom shelf that keeps my overflow in check. That’s the whole setup, and it cost me less than a dinner out. This budget pantry organization idea relies on nothing fancier than cheap glass jars with bamboo lids, black labels, and an honest hour of sorting. I’m going to walk you through exactly how to copy it, even if you’ve never organized anything beyond a junk drawer.
Why You Don’t Need Expensive Pantry Systems to See Progress
Here’s the thing about those fancy pantry renovations you see online: they’re pretty, but they’re not necessary. The photo above has zero custom shelving, no pull-out drawers, and nothing that needed a power drill. It’s just four basic wooden shelves and some storage pieces you can find at a discount store. If you can stack a jar on a shelf, you can do this.
Honestly, the only expensive ingredient is time, and even that’s only about two hours. The jars in that picture were around a dollar each, maybe two. The labels came from a dollar store. The seagrass baskets are the priciest part, but you can find them for less than ten bucks apiece. Compare that to a custom pantry system, and you’ll see why this makes sense.
What to Look for in Cheap Glass Jars With Bamboo Lids
When you’re shopping for glass jars, look for a few main things. A tight-fitting lid is non-negotiable. A wide mouth is also a big deal, because it makes scooping out rice or nuts painless. The bamboo lids on these jars are functional, but they also look a whole lot warmer than plastic tops. You don’t need a matching set from a fancy boutique. A mix of brands is fine, as long as the lids seal properly.
For most dry goods, you’ll want jars in two sizes. Large ones, around 32 to 64 ounces, handle rice, pasta, and flour. Smaller ones, 16 ounces or so, work for nuts, dried fruit, and seeds. Before you buy a bunch, run through this checklist:
- Wide mouth: easier to scoop and pour without spilling.
- Bamboo lid: check the seal before you commit, not all are airtight.
- Dishwasher-safe glass: you’ll thank me later when you clean out leftover oatmeal.
- Different sizes: one size does not fit all, and that’s okay.
How to Label Glass Jars Without Losing Your Mind
Labeling is where the system either sticks or falls apart. I use simple black labels, the peel-and-stick kind you can buy for a few dollars. Write the name of the food and the date you filled the jar. Yes, the date. It sounds like a chore, but it tells you how long that brown rice has been sitting there. I have a weird thing about labels being perfectly straight, so I’ll spend an extra minute with a ruler. It’s probably unnecessary, but it makes me happy.
Just keep it simple: one label, one jar, one glance. Labeled jars are honestly the difference between using your pantry and just staring at it. When you’re mid-recipe and need to grab cumin or coriander, a clear black label saves you from opening six different jars.
The Seagrass Basket Trick for Snack Storage
Not everything belongs in a jar. Snack bags, candy bars, and crackers all come in crinkly plastic packaging that looks chaotic on a shelf. That’s where the seagrass baskets come in. I like to dump entire snack bags into a basket, so you can grab one without digging through a mountain of foil wrappers. In the photo, you can see two of them on the third shelf, holding things like Rits crackers and Orinoco candy bars.
The baskets on the bottom shelf catch overflow. Maybe you bought too much granola or someone left a huge bag of popcorn from a school fundraiser. Whatever it is, it gets a home in a basket. They’re cheap, they’re natural-looking, and they hide all the messy packaging.
A Shelf-by-Shelf Breakdown of This Pantry Makeover
Let’s break down the photo, because the system is easier to copy when you see the logic. The top shelf holds twelve large jars with white rice, brown rice, nuts, and dried fruit. That’s your cooking and baking backbone. The second shelf has fifteen jars in two rows, each labeled with a black label. Those are the smaller items: seeds, spices, maybe some pasta shapes that don’t fit in bigger containers.
The third shelf is for snack baskets, plain and simple. The bottom shelf is for overflow and bigger bags that aren’t worth transferring. This arrangement works because the stuff you use daily lives at eye level, and the less-used bulk stays up top or down below. You can copy this exact layout or adapt it to your own shelf heights.
Beginner Mistakes That Ruin a Budget Pantry Makeover
I’ve made every mistake here, so learn from me. First, don’t buy jars before you know what you’re storing. Wait until you actually see your pantry and your pile of dry goods. Second, don’t try to organize everything in one go. Do one shelf, live with it for a week, then tackle the next. Third, skip the tiny labels if you have bad eyesight. I use a thick black marker in big letters, because squinting at a jar makes you less likely to put things back.
Don’t obsess over matching every single jar either. Mixed jars are fine. Comfortable. Real. The goal is to know where everything is, not to impress a magazine editor. And one more thing: clean the jars before you label them. I skipped that once and spent an hour scrubbing off a sticky label that had been sitting on a dusty jar.
So that’s the whole system: jars, labels, baskets, and a little patience. You don’t need a huge budget or a contractor to have a pantry that actually works. Start with one shelf and see how it feels. And if you figure out a better way to store your dry goods, tell me. I’m always looking for a smarter hack.
Leave a Comment