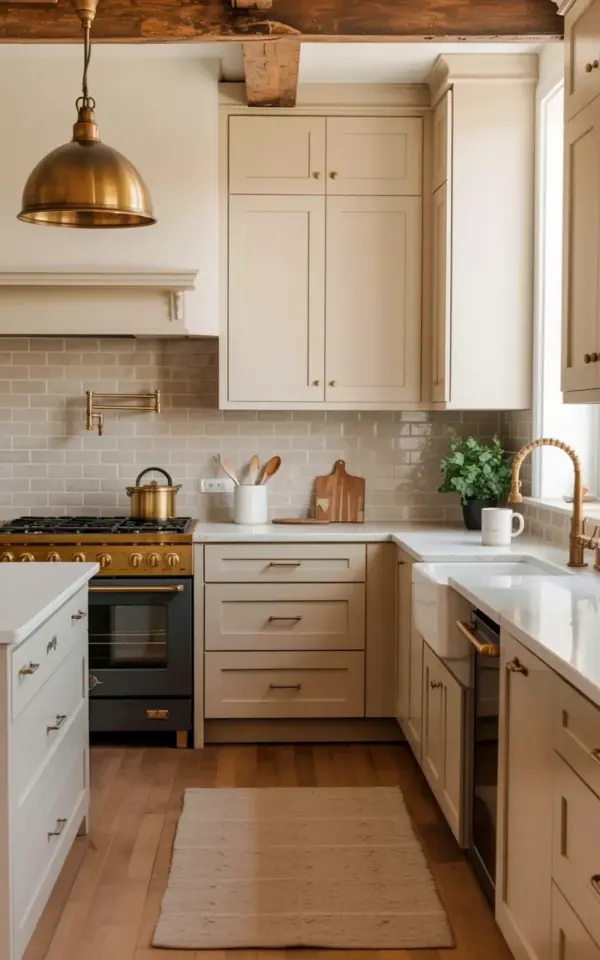
I have always loved the look of a modern farmhouse kitchen on a budget, but I honestly thought it was out of reach until I tried it myself. When we bought our house, the kitchen was a dated mess with dark oak cabinets and a laminate countertop that had seen better days. I wanted that warm, creamy, open feel with brass touches, but I also needed to keep costs low. What I learned is that you can absolutely get the look without spending a fortune, and the tricks I used are the same ones you can use in your own home. The photo above is actually my finished kitchen, and I am going to walk you through exactly how I did it.
Why Cream Shaker Cabinets and Brass Hardware Feel So Custom
The combination of cream shaker cabinets and brass hardware is the backbone of this whole look. I had my existing cabinets painted instead of buying new ones, and it saved me thousands. The cream color is a warm off white, not stark, so it keeps the space feeling soft and inviting without being boring. Brass hardware adds a touch of vintage elegance that makes the whole kitchen feel intentional, not accidental.
Here is what I did for the hardware: I bought simple brass knobs and pulls online for about $2 each. They are solid brass, not plated, and they have held up beautifully for over a year. The shaker style of the cabinet doors is classic, and when you pair it with that warm brass, it really looks like a custom job. If you have flat front cabinets, you can even add shaker style trim yourself for a weekend project.
Painting Existing Cabinets: The Biggest Cost Saver I Found
I cannot stress this enough: painting your existing cabinets is the number one way to stay on budget. I spent about $80 on primer and high quality paint, plus another $30 on sandpaper and painter tape. That is $110 total. A new set of cream shaker cabinets from a big box store would have cost me at least $3,000.
My process was simple: I removed all the doors and hardware, cleaned everything with TSP, sanded lightly, applied a bonding primer, and then two coats of cabinet paint in a satin finish. I used a small foam roller for a smooth finish, and it took me about three days including drying time. The key is patience. Let each coat cure fully before you reassemble. The result was a creamy, smooth surface that looks like factory paint, and nobody can tell I painted them myself.
Light Gray Subway Tile Backsplash: Classic Style for Less
Subway tile is a classic choice for a reason, and light gray subway tile specifically works perfectly in a modern farmhouse kitchen. I used a standard 3×6 inch tile in a soft gray, laid horizontally in a brick pattern. The color is neutral enough to work with the cream cabinets and white quartz, but it adds a subtle contrast that keeps the kitchen from feeling flat.
I bought the tile from a local home improvement store for $1.99 per square foot, so the entire backsplash cost me about $120. I installed it myself over a weekend, using pre mixed thin set and spacers. The horizontal layout makes the space feel wider, and the light gray color hides splashes better than white would. If you are not confident tiling, you can use stick on subway tile sheets, but real tile is worth the effort for the texture and durability.
White Quartz Countertops: Durability Without the Marble Price Tag
Marble is beautiful, but it stains and scratches easily, and the price is usually out of reach for a budget kitchen. I chose white quartz with a subtle fleck pattern. It looks almost exactly like Carrara marble, but it costs about half as much and requires zero sealing. My countertops cost $2,800 installed for about 35 square feet, which includes a farmhouse sink cutout.
The quartz is tough and heat resistant, though I still use trivets for hot pans. It has a slight gloss that reflects light beautifully, and it makes the whole kitchen feel brighter. One tip: choose a quartz with a matte or leathered finish if you want a more natural stone feel, but I went with a polished finish because it cleans easily and matches the glossy cream cabinets.
A Black Range with Brass Accents: Making a Statement on a Dime
My black gas range is the hero of the kitchen. I found a floor model at a discount store for $600, marked down from $1,800 because of a small dent on the side that I covered with the paneling. It is a simple black slide in range with four burners and a center griddle. But the brass accents I added make it look high end. I bought a set of brass range knobs for $15 and a brass griddle handle cover for $8. The contrast of black and brass is striking, and it ties in with the cabinet hardware.
I also installed a brass pot filler on the wall above the range. This was my splurge at $150, but it is a focal point that adds serious farmhouse character. It required a plumber to tap into the existing water line behind the stove, but that cost me only $100. If you are on a super tight budget, skip the pot filler and instead add a brass utensil holder or a brass trivet on the range for the same visual effect.
Small Details That Make the Biggest Difference
Once the major pieces were in place, I layered in the small touches that give the kitchen personality. The large brass dome pendant light hanging from the exposed wooden beam above the island was a flea market find for $40. I rewired it myself, which is easier than you think with a kit from the hardware store. The warm glow it casts at night is exactly what a farmhouse kitchen needs.
- Brass faucet and farmhouse sink: I bought a brass pull down faucet for $75 online and an enameled cast iron farmhouse sink from a salvage yard for $110. The sink has a few chips, but I think that adds charm.
- Beige area rug: A low pile beige rug with a subtle geometric pattern softens the tile floor and makes the space feel cozy. I spent $60 on a 4×6 size from a discount home store.
- Open shelving: I removed two upper cabinets and replaced them with reclaimed wood shelves from an old barn. Total cost: $20 for brackets and free wood from a friend’s renovation.
- Plants and accessories: A small rosemary plant in a brass pot and a wooden cutting board propped against the backsplash add life without clutter.
Final Thoughts: How to Start Your Own Budget Farmhouse Kitchen
If you are dreaming of a modern farmhouse kitchen but think you cannot afford it, start with the paint and hardware. That alone transforms the space for under $200. Then tackle the backsplash, then the countertops, and add the range and accessories as your budget allows. I did this whole kitchen for under $4,000, including the range and countertops, which is a fraction of what a full remodel would cost.
My biggest piece of advice is to take your time and do the work yourself where you can. Painting cabinets and tiling a backsplash are both beginner friendly projects, and the money you save can go toward those special touches like the brass pot filler or the pendant light. Your kitchen does not need to be perfect to feel like a farmhouse dream, it just needs to feel like home.
Have you tried any of these budget friendly ideas in your own kitchen? I would love to hear what worked for you in the comments below.
#farmhousekitchen #kitchencabinets #brasshardware #subwaytile #budgetkitchen
Leave a Comment