Introduction
I have to confess something. For years, I made the worst mistake people make with food storage container organization. I piled everything together. Lids on top of containers, containers stacked inside each other, random plastic tubs from takeout that I swore I would reuse. It was chaos. And every single time I opened that drawer, a lid avalanche would cascade onto the floor. Not gonna lie, I got really good at catching them midair. But here’s the thing: that pile of mismatched bins made me dread meal prep. It made me avoid leftovers. It made me late for work because I couldn’t find the matching lid for my lunch.
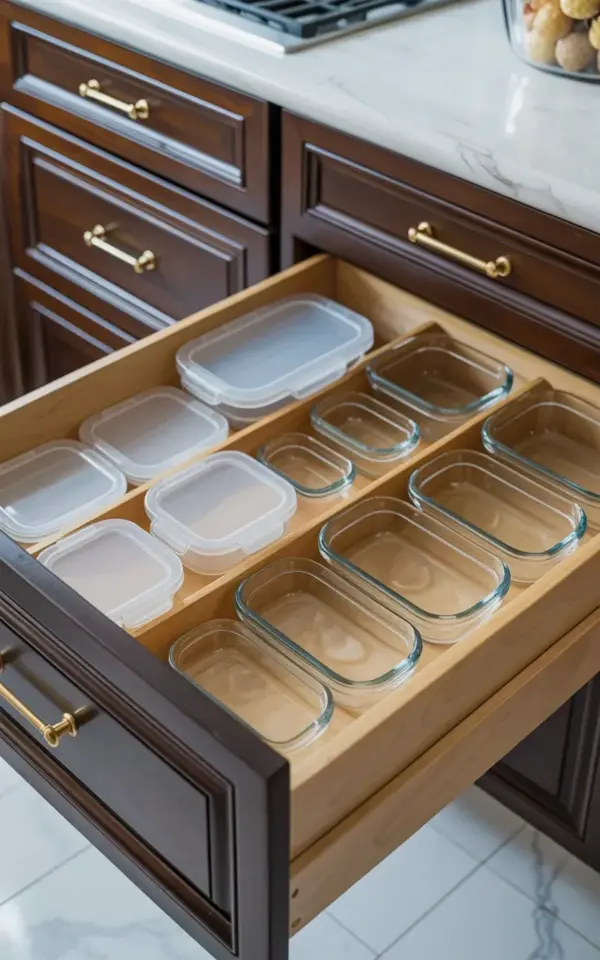
So what’s the one fix that changed everything? Dividers. I used to think dividers were for silverware, not for storage containers. Boy was I wrong. Now I use wooden dividers (like the ones you see in the photo) to keep glass containers and their white plastic lids in separate compartments. It sounds simple, and honestly, it is. But most people skip this step. They assume nesting everything saves space. It doesn’t. It saves about five seconds of cramming and costs you five minutes of frustration later. Let me walk you through how I fixed my drawer and how you can too.
Why Skipping Dividers Creates a Lid Avalanche (And Worse)
Look, I get it. Dividing a drawer into compartments feels like extra work. You have to measure, maybe cut a divider, or buy a pre-made set. It’s annoying. But without dividers, you invite the lid avalanche. That’s the cascade of plastic and glass that happens the moment you open the drawer a little too fast. It’s not just annoying. It’s dangerous. I once chipped a glass container when a heavy lid landed right on its rim. Full tragedy.
But there’s a deeper problem. When containers and lids are mixed together, you can’t grab what you need quickly. You end up spending thirty seconds digging, then you grab a container that’s slightly the wrong size. So you shove it back. The pile gets rearranged. Eventually, you give up and use a zip-top bag instead. That’s how good intentions die. Dividers force a system. They create a place for every lid and every bin. And that system saves your sanity.
Here are the real consequences of skipping dividers, based on my own messy drawer:
- Lids that warp or crack because you jammed them between containers.
- Loss of matching lids. I still don’t know where that medium salsa container lid went. Probably to a farm upstate.
- More time hunting than cooking. Honestly, I once spent over a minute searching for a lid. A minute. That’s sixty seconds I could have used to season chicken.
- You avoid leftovers. Because opening the drawer triggers dread. Not exactly the vibe you want for meal prep.
What to Look For When Choosing Dividers for Food Storage Drawers
Not all dividers are created equal. I tried plastic expandable ones first. They slid around. Then I tried wire grid organizers. Too much poke-through. The wooden dividers in the photo are my final answer. They’re sturdy, they don’t shift, and they look nice against the light wood interior of the drawer. But here’s a personal detail: my drawer pull is brass, and my cabinets are dark brown. The contrast of the warm wood dividers against all that dark cabinetry? It makes me smile every single time I open the drawer. A small joy.
When you shop for dividers, think about height. Most glass food storage containers are pretty tall. You need dividers that are at least as tall as your tallest lid stacked flat. I’d say three to four inches is a good minimum. Also, make sure the dividers fit snugly. If they have a little give, use rubber bumpers or adhesive foam strips to keep them from moving. You don’t want your system to collapse on its own.
Another thing: consider the width of your compartments. On the left side of my drawer, I keep all the plastic lids stacked horizontally. That compartment is wide enough to hold them flat without bending. On the right, I have three narrow compartments for the glass containers themselves. One for small ones, one for medium, one for large. It’s not rocket science. It’s just common sense with a dash of measuring tape.
Step by Step: How to Organize Your Glass Containers and Lids
I’m going to give you the exact process I used. It took me about twenty minutes, including a drawer purge. You’ll need a ruler, a pencil, and your dividers (plus any spacers). Ready?
- Empty the drawer completely. Pull everything out. All the containers, all the lids, that forgotten Tupperware from 2019. Lay it on the counter. This is the moment of truth.
- Sort all the plastic lids. Group them by size. Stack them flat in a pile. If a lid is warped, cracked, or missing its container, toss it. Be ruthless.
- Sort the glass containers. Nest the ones that fit together perfectly. If you have a set with lids that are truly interchangeable, keep them as a set. But if you have random sizes, that’s fine. Just group by approximate width.
- Measure your drawer’s interior. Mine is 24 inches wide and 18 inches deep. I wanted three tall sections for containers and one wide flat section for lids. So I divided accordingly.
- Place the dividers. I put a single long divider across the front of the drawer, creating a strip about 4 inches deep. That’s the lid zone. Then I put two perpendicular dividers going from that strip to the back of the drawer, creating three columns.
- Insert the lids. Stack them neatly in the front strip. Don’t stack too high. Two or three deep max. Otherwise you’ll create a mini avalanche when you grab one from the bottom.
- Place the containers. Stand them upright in their columns. Tallest against the back if they protrude, though most glass containers are similar height.
And that’s it. Seriously. The photo shows exactly this setup: left side lids stacked horizontally, right side three compartments filled with clear glass containers. It’s so clean that sometimes I open the drawer just to admire it. Not gonna lie.
The One Container Rule That Saved My Drawer
Here’s something nobody talks about. Even with perfect dividers, you can still have a mess if you own too many semi-matching sets. I had three different brands of glass containers. They all had different lid shapes. Some had snap-on lids, some had screw-on. My drawer still felt cramped. So I made a rule: only keep one brand of food storage container in the drawer. I chose a moderate-sized set with identical lids that fit all sizes. Everything else? I donated or repurposed.
Honestly, this rule hurts at first. You might love that round glass bowl from a fancy yogurt you bought once. But round bowls take up weird space in a straight-divided drawer. They create awkward corners. Let them go. Stick to square and rectangular shapes. They stack like bricks. Your future self will thank you when you grab a container and the lid snaps on perfectly every single time.
Now, I have exactly eight containers: two small, four medium, two large. Each lid fits any of the eight. That’s the magic. Dividers can’t fix a collection that’s inherently chaotic. They can only organize what you already have. So cut the clutter first, then divide.
Common Mistakes People Still Make (Even With Dividers)
I see it online all the time. Someone buys fancy dividers, puts them in the drawer, and then crams mismatched containers in any which way. Dividers are not magic. You have to work with them. Here are the top blunders I’ve spotted (and made myself):
- Stacking containers on top of each other in the same compartment. That defeats the purpose. If you stack, you pull out the top one and the bottom one tips over. Always stand containers upright, one deep per compartment.
- Forgetting to measure lid thickness. Some lids are chunky, especially the ones with silicone seals. If your lid compartment is too narrow, you’ll have to stack them vertically, which leads to falling. Test a stack of three lids before committing to the divider spacing.
- Using dividers that are too short. If your drawers are deep (mine are 4 inches tall), short dividers let containers lean over the top. They’ll spill into neighboring compartments. Make sure the divider reaches at least three-quarters of the drawer depth.
- Not labeling the compartments. I know, labels feel overkill. But when you’re in a hurry, you’ll toss a small container into the medium slot. Then the next time you need a small one, it’s hidden. A tiny label that says “Medium Containers” costs nothing and saves clutter.
- Keeping containers you never use. I had a square glass dish that was too tall for my drawer. It lived on the counter for six months before I donated it. Be honest about your actual storage needs. Do you really need that 4-cup giant rectangular dish? Probably not.
A Quick Maintenance Tip for Long Term Order
Ok so you’ve set up your dividers. Your drawer looks like a magazine spread. But life happens. You’re making soup at midnight. You grab a container, pop the lid, and shove the empty container back without checking its compartment. Over time, things migrate. My solution: once a month, while you’re listening to a podcast or waiting for coffee to brew, open the drawer and do a quick reset. Realign any stray containers. Flatten any lids that got bent. It takes two minutes.
Another habit I love: when you empty a container of leftovers, immediately wash it and put it back in its spot. Don’t leave it in the drying rack to be forgotten. That’s how you end up with a pile of clean containers on the counter and a mess in the drawer. Force yourself to return it. After a week, it becomes automatic. And your beautifully divided drawer stays beautiful.
Conclusion
So here’s the short version. The worst mistake people make with food storage container organization is skipping dividers. I know because I lived through the chaos. But a set of simple wooden dividers (like the ones in the photo, with clear glass containers on the right and stacked white lids on the left) turned my drawer from a disaster into a delight. It’s not a huge project. It’s not expensive. It just takes a little measuring and the willingness to purge what you don’t need. Try it this weekend. Open that drawer, pull everything out, and give yourself permission to organize with dividers. I promise your future self will thank you. And if you do it, let me know how it goes. I’d love to hear about your lid avalanche becoming a thing of the past.
#kitchenorganization #foodstorage #drawerorganization #kitchendrawers #mealprepstorage
Leave a Comment